Recently I was talking to a friend who is preparing for her daughters 1st birthday celebration and she showed me a picture of floral hoops that she was hoping to order for the picture backdrop. We were looking at etsy to order them, and were surprised by the price they were being sold for. Here’s the deal, creatives deserve every cent they charge for their creations. However sometimes it just doesn’t fit the events budget OR you simply can’t find exactly what you are looking for. Both fit this particular situation. So, what did I do? I decided to make them myself!
In typical Kayty fashion I looked at a few pictures and thought, “huh, I can do that!” And about a half an hour later I was at the craft store. 50% of the time Colby looks at me and tells me, I told you you should have looked into it more before you started. The other 50% we both think, wow I CRUSHED that. This was one of those times we realized that it not only was simpler than I thought it would be, we realized that it’s something that YOU are totally capable of too!
Here is what I love about this, it can be used for a dainty first birthday celebration, or the backdrop of our studio kitchen! It can cover a bohemian style or a traditional style. The versatility of this made me want to share it with you even more. I’ll be honest it‘s not fast, but it is easy! Here is what you need and what I learned along the way:
What You’ll Need:
- Wire Cutters
- Floral Tape
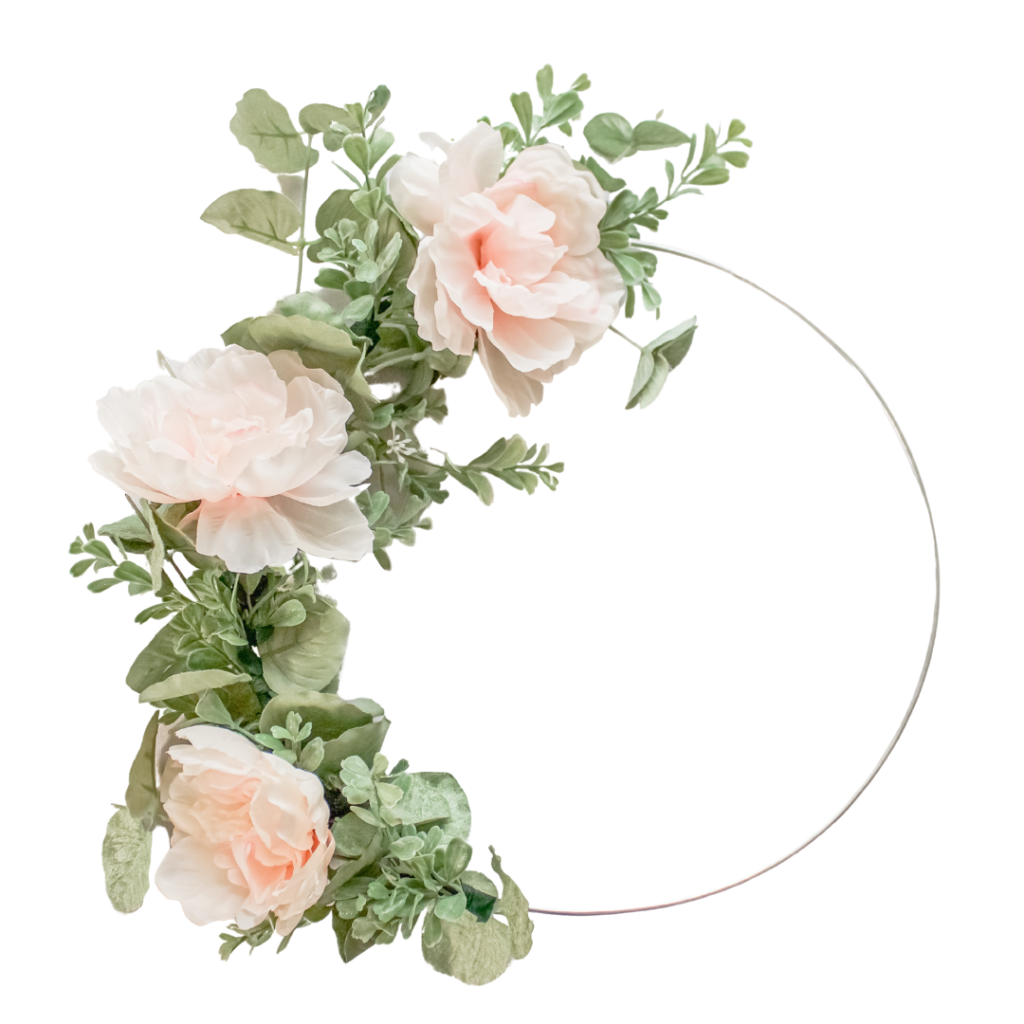
- Wire or wood Wreaths: Size depends on where you are putting them, they range from 6”+. I used 12” in the picture above.
- 2 types of silk greenery 1 large leaf, 1 small leaf: I recommend one full stem of each type per wreath i.e 4 wreaths 4 full stems of large leaves and 4 full stems of small leafs
- Silk Flowers: This is based on the design you’re going for! I recommend a mix of large and small flowers. Quantity will vary depending on your final goal

Trim the silk flowers & leaves:
In order to place the leaves and flowers on the wire wreath you need them to have a little bit of “blank stem” but not so much over hang that its hanging off the wreath. With your wire cutters, cut the flowers and leaves with about 1” of the stem attached. This is where the tape will be applied.
You will notice that I didn’t cut off single leaves and attach them, but rather cut them in “branches”.
Start with your biggest leaf greens
Decide if you will be going in a full circle around the wire or a half circle. Either way evenly space out the large greens around the wire. Line up the blank part of the stem with the wire. Take a piece of floral tape (It is not sticky at first) and TIGHTLY wrap it around the wire.
If you haven’t worked with it before, it does not “activate” until it’s tightly wrapped around itself. Be generous with the tape until the branch feels secure.
Move on to your small leaves
FIll in some of the space between the big leaves with the smaller greens in the same way. Don’t be afraid to add as much tape as you need. If the wreath is “full” enough, all the tape will be hidden.
At this point you should like it but wont love it. Essentially at this point your “background” should be all set! If you feel it needs more filling, go ahead and add more of each greenery type.
Map Out & Secure the Flowers
Work biggest to smallest! I suggest mapping out your flowers before you secure them.
Lay out the bigger flowers first as those lead the whole design. Then fill in with any small flowers, branches, embellishments etc. Secure them with your tape as you did with the greens.
At this point you may want to take a breather before you move on to the next wreath, because wow that can take some time…but you did it! If you feel that anything is loose just go ahead and secure it with some more floral tape!
Hang Them (Optional)
Are you looking to hang your wreaths like we did in our studio kitchen? You have two options! 1. Use fishing wire (clear) to give the illusion of them floating 2. You can also use a very soft chiffon ribbon to add another decorative element!
Are you making your own floral wire wreath? Be sure to tag us @gatherintentionalliving #gatherintentionalliving we cannot wait to see what you created!


back to top